Infocube Creation Step 4 using SAP BI 7.0


In this section, we will see how to define Data Transfer Process and load data in InfoCube using SAP BI 7.0. Data Transfer Process makes the transfer processes in the data warehousing layer more transparent.

28) Now define, Data Transfer Process as shown


29) Enter the source of DTP
30) Activate the DTP after maintaing the required settings


31) Create a InfoPackage by right clicking the DataSource


32) Execute the InfoPackage to load data into PSA
33) Check the data load in PSA by double clicking the DataSource
34) Execute the DTP

35) Check the data in InfoCube


Infocube Creation Step 3 using SAP BI 7.0


In this section, we will see how to create transformation.

20) Replicate the data source, select the source system, 
right click and select 'Replicate DataSources'
21) Select the data source as RSDS DataSource

22) Select the InfoCube and right click to 'Create Transformation'

23) Select Source and Target for Transformation


24) System will propose the mapping, incase system does not propose, select the InfoObject and drop for mapping

25) For 0CALMONTH, a constant will be used in this case, define the constant

26) After defining, press 'Transfer Values'

27) Check and activate the transformation


In the next section, we will see how to create Data Transfer Process and load data in InfoCube

Infocube Creation Step 2 using SAP BI 7.0


Infocube uses concept of star schema. Infocube is created using Characteristics and Key Figures.


Characteristics are levels on which reporting has to be performed. For example, Product, Customer and Plant.

Key Figures are measures used for characteristics. For example, sales quantity for a product, customer and location combination.

In this section, we will see how to create InfoCube using SAP BI 7.0.

The InfoCube creation process is some what different and is similar to ODS creation process of SAP BW 3.5. Navigation is also different as screens opens with-in RSA1.

10) Select the InfoArea and right click, select 'Create InfoCube'


11) Enter name and description of the InfoCube and press 'Create'


12) The screen is very different from SAP BW 3.5, the screen is similar to ODS creation screen in SAP 

BW 3.5. There are folders available for Dimensions, Navigation Attributes and Key Figures
Right click 'Dimension 1' to assign a characteristics to Dimension 1

13) Enter the characteristics and press 'Continue'


14) To create new dimensions, right click 'Dimensions' folder and press 'Create New Dimensions'


15) Press 'Continue' button to create new dimension or press 'Create' to create more than one dimension at a time


16) Select 'Time' dimension and right click to add time characteristics '0CALMONTH'


17) Similarly, add Key Figure to 'Key Figure' folder by right clicking


18) Check the InfoCube for any inconsistencies and activate the InfoCube


19) InfoCube will be created as shown


In the next section we will see how to create Transformation between InfoCube and DataSource

Infocube Creation Step 1 using SAP BW 3.5


Infocube uses concept of star schema. Infocube is created using Characteristics and Key Figures.

Characteristics are levels on which reporting has to be performed.
For example, Product, Customer and Location

Key Figures are measures used for characteristics. For example, sales quantity for a product, customer and location combination

We will see how Infocube is created using Infocube creation step 1, 2 and 3.

Logon to SAP and Execute transaction RSA1

1) Create an Info Area

1a) Select the 'Info Provider' and
right click
1b) In the next screen, give a technical name to Info Area with Description
2) Create an Info Object Catalog for Characteristics and Key Figures

2a) In the above image, at the left hand side, press 'Info Objects'

2b) Locate the Info Area created in step 3 and right click

2c) Select 'Create Info Object Catalog'


2d) In the next screen, give a name to Info Object Catalog and select 'Char.' and press create

2e) Activate the Info Object Catalog for characteristics created in step 2d)

2f) Create another Info Object Catalog for key figure by selecting 'Key Figure'

3) Create Info Objects as Characteristics and Key Figures

3a) Select the Info Object Catalog for Characteristics and right click

3b) Select Create Info Object, name the Info Object and select the
data type

3c) Activate the Info Object


Illustration 1:

3d) Similarly, select Info Object Catalog for Key Figure and right click


3e) Select Create Info Object, name the Info Object, Select data type and activate
4) Create an Info Cube
4a) Select 'Info Provider' in the left hand section, locate the Info Area and right click to create Info Cube
4b) Give a name and description to the Info Cube and select as Basic Cube
4c) Select the Info Objects as Characteristics by clicking the transfer button and press 'Dimensions' to define dimension

4d) Define Dimensions based on Characteristics


4e) Assign dimensions to characteristics, for assigning, select the characteristics check box and place cursor at dimension and press assign

4f) Select 0Calmonth and 0Calweek as time characteristics

4g) Select the required Key Figures and activate the cube


In the following section we will be discussing following:
5) Create Info Source
6) Assign Info Source to Data Source
7) Define Communication Structure and Transfer Rules
8) Define Update Rules
9) Define Info Pack
10)
Load data and check data in Info Cube

Loading plan and actual data into the same InfoCube


Today, I had a discussion with my colleagues, about loading plan and actual financial data into the same InfoCube. The process seems to be easy, but update mode and aggregation issues make me consider different way of loading such a data.

The actual data need to be loaded with delta update mode, plan data (e.g., 0VTYPE 20) can only use full update and the previous load need to be deleted to avoid duplicated data. I consider 3 loading options:

1. Automatic removal of the previous load after data loading using InfoPackage.

To use this option we need to modify the InfoPakage that is used to load data. In the DataTarget tab we choose Automatic Loading of Similar/Identical Requests from the InfoCube and then Delete Existing RequestsFull or Initial RequestsSame or More Comprehensive.


Now we can schedule the job or add the load to a process chain. After the update, Same or More Comprehensive requests will be deleted.

2. Delete previous load in the process chain.

The second option is to build a process chain (TCode: RSPC) to load data and add deletion of the previous load of plan data using Delete Overlapping Requests from InfoCube option.


3. Remove previous data via ABAP program using DELETE_FACTS.

This option requires including in a process chain an ABAP program that performs selective deletion of the data (TCode to generate the program: DELETE_FACTS).

I must also take into consideration data aggregation. If I have both actual and plan data in one InfoCube I can not aggregate the Cube. One of the option is to create two InfoCubes, the first for actual data (delta update) and the second for plan data (full update), and aggregate the first one. The second option is to remove plan data from our InfoCube before aggregating the InfoCube. I think I will choose the option with two InfoProviders because it appears to be more flexible to maintain.

What is your experience with loading plan and actual data? Which loading option do you prefer and how do you solve the aggregation issue? Feel free to comment the post and share your opinion with us.

Note: The overall issue is related not only with plan values but also with down payments, overall plan values, variances and accrual calculations. For these values only a full update is possible.

InfoObjects - where it all starts


InfoObjects are the smallest pieces in SAP BW puzzle. They are used to describe business information and processes. Typical examples of InfoObjects are: Customer Name, Region, Currency, Revenue, Fiscal year.

There are five types of SAP BW InfoObjects: Key figures, Characteristics, Unit characteristics, Time characteristics, and Technical characteristics.
The following picture illustrates the different InfoObject types and their examples.
InfoObject types

Key figures

Key figures describe numeric information that are reported on in a query. The most popular types of key figures are:
  • Quantity - numeric values with associated unit of measure;
  • Amount - numeric values with associated currency;
  • Date - enable date computation;
  • Time - enable time computations;
  • Number;
  • Integer.

Characteristics

Characteristics describe business objects in BW like products, customers, employee, and attributes like color, material, company code. They enable us to set select criteria during which we display required data.

Unit characteristics

Unit characteristics provide a meaning of key figures values, stores currencies or units of measure (e.g., currency unit, value unit).

Time characteristics

Time characteristics describe time reference of business events. They build the time dimension - obligatory part of InfoCube. The complete time characteristics (clearly assigned to a point in time) provided by SAP: calendar day (0CALDAY), calendar week (0CALWEEK), calendar month (0CALMONTH), calendar quarter (0CALQUARTER), calendar year (0CALYEAR), fiscal year (0FISCYEAR), and fiscal period (0FISCPER). Incomplete time characteristics: CALMONTH2, 0CALQUART1, 0HALFYEAR1, 0WEEKDAY1, 0FISCPER3.

Technical characteristics

Technical characteristics have administrative purposes (e.g., stores request ID, change ID).

InfoObjects catalogs

SAP BW InfoObjects are stored in InfoObjects catalogs, separately Key figures and Characteristics (all types). Usually there are two InfoObjects catalogs (for Key figures and Characteristics) defined for every business context in SAP BW implementation.

Detailed information on particular InfoObject you can find in the Modeling area of the Data Warehousing Workbench (TCode: RSA1 -> Modeling -> InfoObjects).

Reporting User and Developer


I've notice that often it is helpful, during project realization, to generate sample user roles for testing purpose. In this post I will show how to generate query developer and query user role with access to the menu role.

Reporting User (query user with menu role)

Our general reporting user will be executing queries in the BEx and Web Analyzer. He will have an access to menu folder role, from where he will be able to see and execute assigned queries and workbooks.

You need to perform the following steps:
1. Create menu folder role:
  • To create the new role using TCode PFCG, enter a name of the role (e.g., ZBW_RU_MENU) and press Single Role button.
  • In the Menu tab create additional menu folders.
  • Add queries/workbooks to the menu: click Report button, choose BW Report or SAP Query and enter the report ID or the query name.
TIP: You can save queries to the role from the BEx Query Designer -> Query -> Save as; workbooks from the BEx Analyzer -> Save -> Save Workbook As.
  • Add users using User tab. Direct user assignment will work OK, but more flexible solution is to assign user indirectly using user's organizational unit. To assign organization unit to the role use:
  • a) PFCG -> Goto -> Settings -> Complete view.
  • b) Modify created role, choosing User tab -> Organization Mgmt -> Create assignment ->Organizational unit.
  • Compare user master record - click User comparison.
  • Save the Role. Authorizations tab's light will be red - it is OK because we will define Authorizations in separate role.
2. Create authorization role:
  • Use transaction code PFCG, enter a name of the Role (e.g., ZBW_RU_ALL) and press Single Rolebutton.
  • Add initial authorizations from the template: chose Authorizations tab -> Change Authorization Data -> S_RS_RREPU (BI Role: reporting user) -> Adopt reference. You may modify adopted authorization according to your needs. Remember that, in the analysis authorization, objects: S_RS_HIER, S_RS_ICUBE, S_RS_ISET, S_RS_MPRO, and S_RS_ODSO are not checked during authorization verification.
  • Add menu authorization: Click Manually button, enter S_USER_ARG object and press Continue. Edit node: Authorizations: Role check, add Activities: 03 (Display), Role Name: name of the role created previously (point 1.)
  • Remove InfoArea button from Select Query screen: Click Manually button, enter S_RS_FOLD object and press Continue button. Edit node: Business Explorer - Folder On/Off, Activities: X (True).
  • Generate Authorization (Shift+F5).
  • Add users using User tab (see my comment in previous point).
  • Compare user master record: User tab -> User comparison.
  • Save the Role.
3. Verify authorization
  • Use transaction RSECADMIN, Analysis tab to execute query as query user.

Query Developer

Our query developer will be designing queries, workbooks and web applications. He will be scheduling broadcasts setting, maintaining analysis authorizations and their assignments to roles.
To create authorization for query developer, perform the following steps:
1. Create authorization role
  • Using PFCG transaction create single role and add initial authorization from template S_RS_RREDE (BI role: Reporting Developer).
  • Generate Authorization (Shift+F5).
  • Add users using User tab.
  • Compare user master record: User tab -> User comparison.
  • Save the Role.
2. Verify authorization
  • Verify authorization using BEx Query Designer and Analyzer.
In similar way you can create authorization for other users. The templates for BI user roles start with S_RS except roles for Business Planing which start with S_RS_PL.

Summary

Using authorization template you can accelerate process of authorization assignment, but in most cases you should use it as a basis of further work, not a target solution. I encourage you to learn SAP BI analysis authorization concept which gives great flexibility when working with characteristics and navigation attributes.

SAP BI 7.0 Authorization - Part 2: Creating and assigning authorization


I the previous articles I discussed InfoObjects level authorizations. Now I will focus on creating and assigning authorization.

Creating authorization

To create analysis authorization perform the following steps:
1. Use TCode RSECADMIN, go to the Authorizations tab.
2. Press Maint. button and enter a name (e.g., Z_USR_A1) and press Create.
3. Fill required Short Text field.
4. Insert special characteristics: 0TCAACTVT, 0TCAIPROV, and 0TCAVALID by pressing Insert Special Characteristics button.


5. Insert authorization-relevant characteristics and navigational attributes (Insert Row -> press F4 -> choose item). I described how to set InfoObjects as authorization-relevant in previous articles.
6. Press Details button to restrict values and hierarchy authorization of inserted items.
7. Save the authorization.

You must include special characteristics: 0TCAACTVT (activity), 0TCAIPROV (InfoProvider), and 0TCAVALID (validity) in at least one authorization for a user. They are used for:
  • 0TCAACTVT - to restrict the authorization to activities, default value: Display;
  • 0TCAIPROV - to restrict the authorization to InfoProviders, default value: all (*);
  • 0TCAVALID - to restrict the validity of the authorization, default value: always valid (*).
If you want to authorize access to key figures, add 0TCAKYFNM characteristic to the authorization. It is important to know that if this characteristic is authorization-relevant, it will be always checked during query execution.

0BI_ALL authorization

The 0BI_ALL authorization includes all authorization-relevant characteristics. It is automatically updated when you restrict a BI InfoObject. Use this authorization if you have users that are allowed to execute all queries.

Assigning authorization to a user

You may assign authorization directly to a user or to a role. To assign authorization directly use TCode RSECADMIN, go to the User tab and press Assign. Now enter the user name, press Change and select the authorization. To assign authorization to the role use TCode PFCG, enter the role name and press Change.Using Authorization tab change authorization data by adding S_RS_AUTH entry. The entry includes analysis authorization in roles. Enter here authorization that you previously created.

Summary

I encourage you to collect all requirements related to BI security, structure of the organization and authorization needs before starting authorization preparation. I have learned that it can save a lot of time. Organization's hierarchy can facilitate your work by providing structures and levels of authorization. Indirect authorization assignment can also save your time because it is more flexible and easier to maintain.

SAP BI 7.0 Authorization - Part 1: InfoObjects level authorization


New SAP BI 7.0 Authorization concept (analysis authorization) change a lot in accessing, analyzing and displaying BI information. The approach allow to restrict data access on Key figure, Characteristic, Characteristic value, Hierarchy node, and InfoCube levels. It enables more flexible data access management.


Analysis authorization is active by default in SAP BI 7.0 systems and I think it is worth to spend some time to look closer at the new concepts and the features. In part one of this two-article series, I will show you how you can restrict access to SAP BW reports on InfoObjects level.

Initial settings

At the beginning activate business content objects (TCode RSORBCT) related to authorizations:
  • InfoObjects 0TCA*
  • InfoCubes 0TCA*
and set the following InfoObjects as Authorization-Relevant:
  • 0TCAACTVT (activity such as Display)
  • 0TCAIPROV (InfoProvider authorization)
  • 0TCAVALID (validity period of authorization)
  • 0TCAKYFNM (if you want to restrict access to key figure)

Characteristics authorization

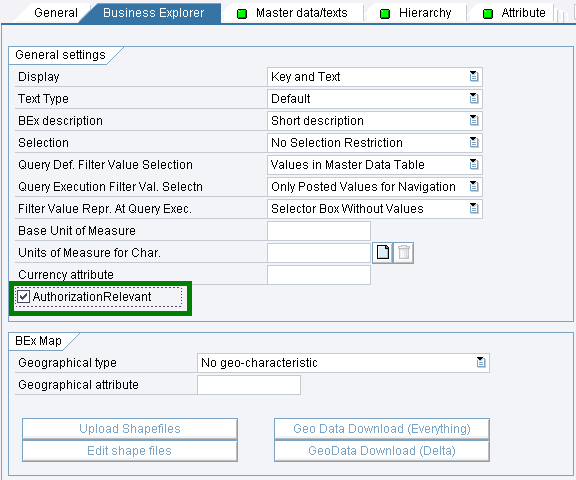
Use TCode RSA1, go to Modelling -> InfoObjects. Display properties of the characteristic to which you want to restrict access and set it as Authorization-Relevant.


Characteristics values authorization

To authorize characteristics values you need to create new authorization object through TCode RSECADMIN. The following pictures show how allow users to access to specific sale organization (e.g., New York, San Francisco, Dallas).
1. Create new authorization object (e.g., Z_SORG_B).


2. Choose characteristic and press Details button.


3. Select sales organization (e.g., 1612 - New York, 1614 - San Francisco, 1615 - Dallas). Available operators: EQ - single value, BT - range of values, CP - pattern ending with (*) (e.g., abc*). You have also option to Include (I) or Exclude (E) values.

Attributes authorization

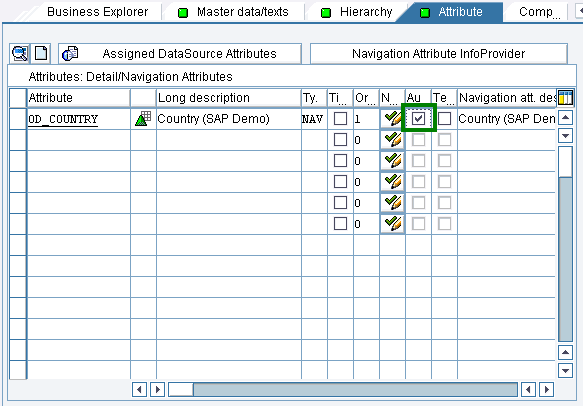
To authorize navigational attributes, set them as Authorization-Relevant.

Hierarchies authorization

To grant authorization on hierarchy level edit or create authorization object (e.g., Z_SORG_B), add hierarchy and nodes, and choose type of authorization.

Key figure authorization

To grant authorization to particular key figure, add special object 0TCAKYFNM to authorization object (e.g., Z_SORG_B), and choose the key figure to be authorized.

Summary

InfoObject level authorization gives you a great flexibility, but keep in mind system limitations. Avoid setting too many characteristics as authorization relevant (more than 10 in a query). All marked characteristics are checked for existing authorization if they are in a query or in an InfoProvider that is being used. Too much authorization objects may slow query execution. Exception are characteristics with all (*) authorization. If you want to check which InfoObjects are authorization relevant in your BI system, use TCode RSECADMIN -> Authorization Maintenance and display 0BI_ALL authorization. More about 0BI_ALL you will find in the article on creating and assigning authorization.

Remember that authorization do not work as a filters do. It means that the user who is executing the query, where characteristics are authorization relevant, must have sufficient authorization to the characteristics ("all-or-nothing" rule). Exceptions are hierarchies in the drill down and variables which are dependent on authorization.

In part two, I will describe how to create and assign SAP BI authorization .